Learning to use graphics tablets
STARTER: Watch this video (from 1min 30sec in)
Your task for the two lessons today...
You are asked to master the graphics tablets and create a line drawing in the style of Paul Kenton.
|
To be successful you will need to:
- work over a photograph from Witley court - ideally one that you have previously drawn. - use scruffy lines in the style of the artist - black lines - possibly a spash of colour. |

|
For example...

Step by step instructions
Open Photoshop.
Go to File... Open... Student Shared... Art... Miss Wilson... Year 10... Witley court.
Select a photo to draw and open it.
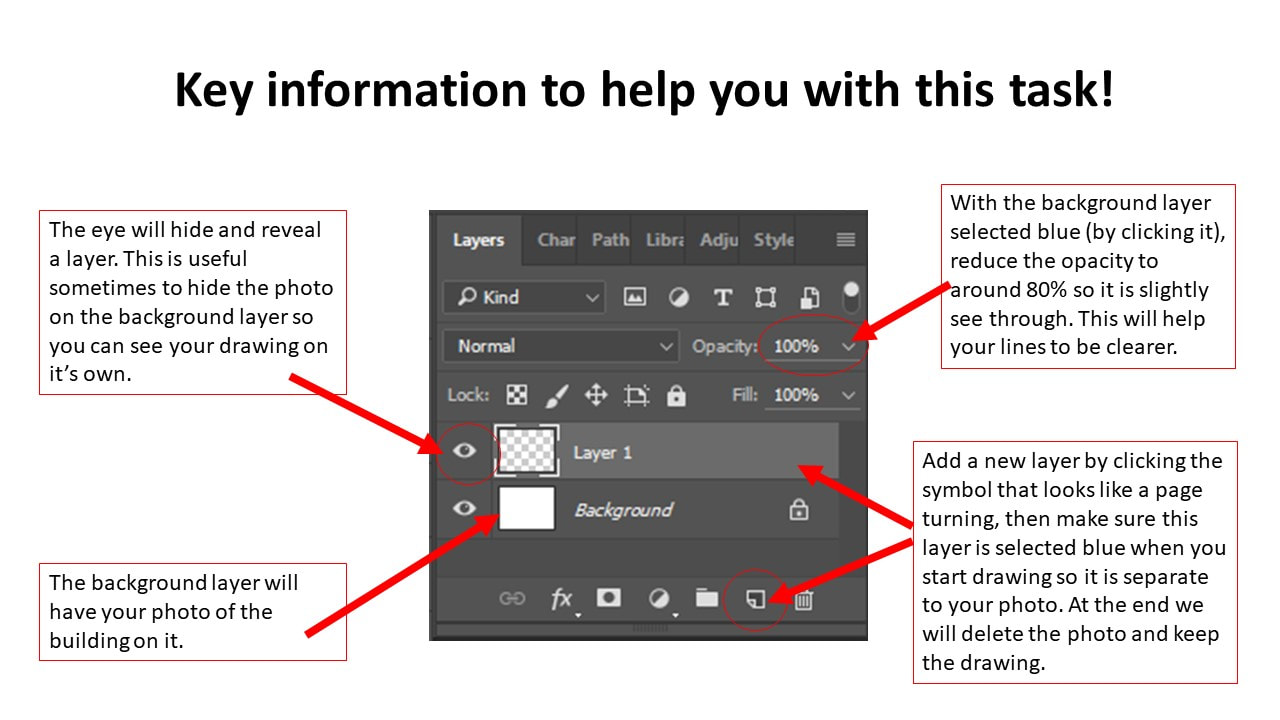
In the bottom right of the screen you will see a 'layers' tool bar. If yours is missing, go to Window then click layers. Click the page turning symbol for a new layer.
This is the layer you will draw on.
Go to File... Open... Student Shared... Art... Miss Wilson... Year 10... Witley court.
Select a photo to draw and open it.
In the bottom right of the screen you will see a 'layers' tool bar. If yours is missing, go to Window then click layers. Click the page turning symbol for a new layer.
This is the layer you will draw on.
|
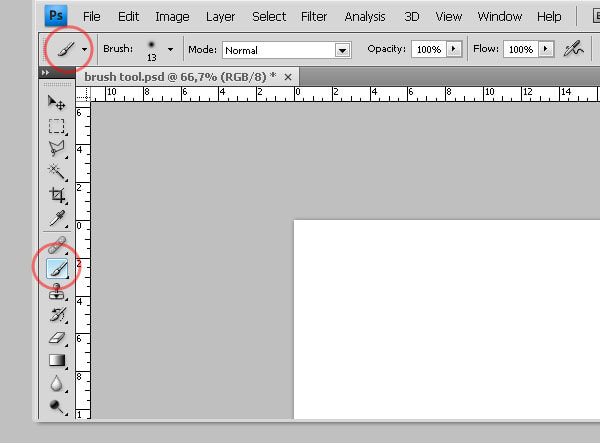
Select the brush tool.
Change the size to a suitable pencil to draw with. Also change the hardness to 100% Make sure it is black. You are now ready to start drawing! Trace over your photo, go into as much detail as you can, but keep your lines loose and scruffy like the artist. Use the magnifying class to zoom in if you need to! |
|
Finished?
Save your work to your area.
Print it to IT4 if it is just black and white... OR to AVA MFD TECH if you have some colour splash details.
Print it to IT4 if it is just black and white... OR to AVA MFD TECH if you have some colour splash details.
Going for gold!
If you have time, the next task will be to do another drawing of a different photo, with the intention to layer the two together later in the style of David Bushell.
Save this separately.
Save this separately.
